

 Many
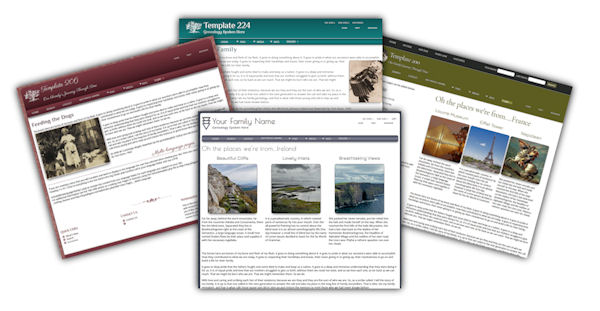
of you want additional pages in your TNG site. I've created a couple of
different styles from Darrin's basic history template. They work with all
versions of TNG. You can view them in
my templates. Go to the
demo
page and choose any template. There is a button to the HISTORIES pages.
Our histories pages match the template you choose. I like the two
column with the navigation on the left. This way, your users can see all of your
pages from everywhere in the histories folder.
Many
of you want additional pages in your TNG site. I've created a couple of
different styles from Darrin's basic history template. They work with all
versions of TNG. You can view them in
my templates. Go to the
demo
page and choose any template. There is a button to the HISTORIES pages.
Our histories pages match the template you choose. I like the two
column with the navigation on the left. This way, your users can see all of your
pages from everywhere in the histories folder.
Also, just because the page is listed as places.php, doesn't mean it's only for places. If you have a Fred Jones family, you can just copy the "place" page and rename it to jonesFred.php. I like using last names first in my genealogy files because I don't want to look through 100's of Freds to find my Fred Jones.
The newest zip file download is here: https://genealogywebtemplates.com/histories-2025.zip
You do not have to use one of my templates for these files to work. They work with all TNG templates. The styling you need to add to your css file is included.
This histories file contains an "include" page in order to make navigation easier. The name of the page is sidenav.html. All you need to do is change the navigation on that page and then upload it. The changes will be reflected on all of your pages.
You will need ftp access to upload the histories files. I use Filezilla, but you can use any ftp program that you like.
There are a few FTP programs that you can use to upload your file to the web. Most of the interfaces look very similiar. Below is a screenshot of "Filezilla." You will need the information shown below on all of the programs.
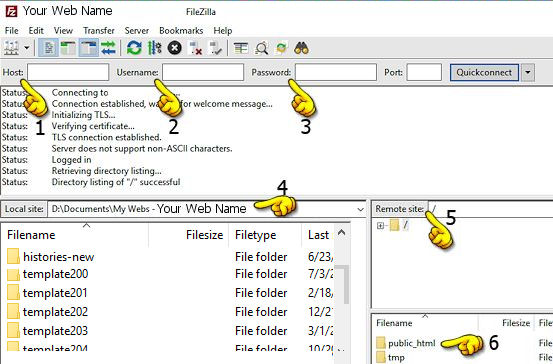
1. Host - Your domain name/url goes here
2. Username - This is the FTP username you created with the host (your server company)
3. Password - This is the FTP password you created with the host - It may or may not be the same as your password to sign into your control panel with your host.
4. The Local Site - This is where you will navigate to in order to find your web. These files are on your computer and are listed on the left in filezilla.
5. The Remote Site - This is the host or web files which are listed on the right in filezilla.
6. You will click on the public_html in order to upload your files. Find the tng/histories folder.
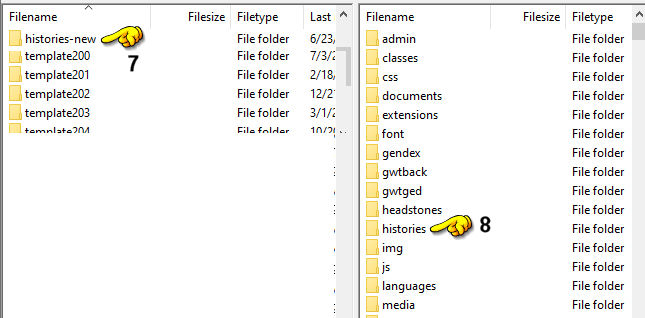
7. Navigate to your histories-new file (or wherever you placed your new history page) and then open it by double clicking on the folder to see the files.
8. Find the "histories" folder inside TNG and double click on it to open it.
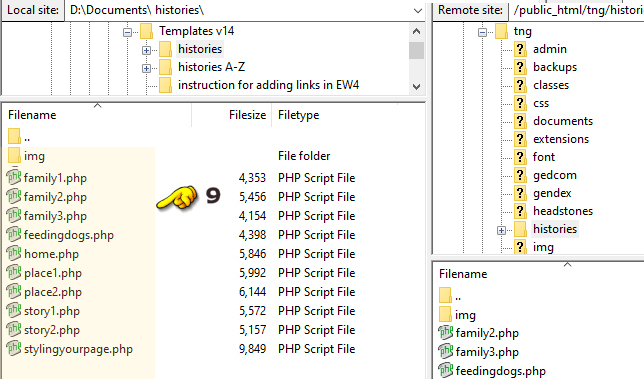
9. After opening the file, highlight the pages you wish to upload and then right click and choose "upload" or drag the files from the local site (your computer) to the remote site (the web).
The url (web address) will be "https://yourdomainname.com/histories/home.php"
It may be something different if you have tng inside a main web. (The
"s" in https:// means your site is secure. You will need to ask your web
host about securing your site.)
For coding in the input boxes in the Template Settings page, take a
look at the bottom of this page for TNG Specific Coding.
https://genealogywebtemplates.com/quickhtml.asp
If you are not using a html editing program and you are required to write code, you can use this to help you: https://wordtohtml.net/ and their program will convert text to html coding.
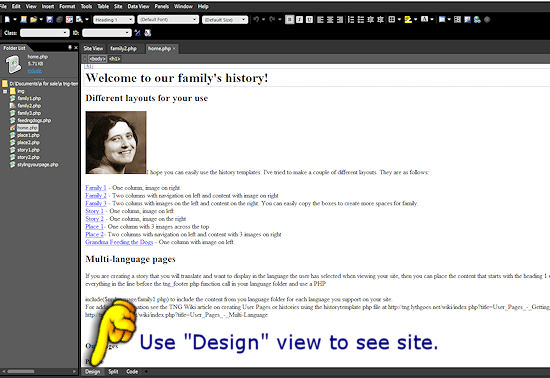
For the histories pages, all you need to do is to type where I have text. If you don't have an editing program, I use Expression Web 4. It has been discontinued by Microsoft; however it still works great for editing. I have a copy of it to download here, if you want to install it. It contains a "Design" view which will show you where most of the text goes and it won't be in code view unless you choose that tab. It's great for people that are not that familiar with html as it writes the code as you type it in. I do not have a Mac version of Expression Web.
Expression Web 4 is a WYSIWYG (What you see is what you get) editor. The example below is what you see in Expression Web and what it looks like online:

There are six heading tags used in my templates. Your colors and sizes will depend upon which template your purchased. If you are using a template from TNG, some of the heading tags may be defined as a distinct color and size. If not, they'll just be the default font color & size.
The Drop Cap can be done by applying the dropcap class to the paragraph.
<p class="dropcap">First Letter of your paragraph</p>
Most of my templates have different colors and sizes that can be used on text as well as aligning text to the right. You can check your specific css file for those. Examples of this include:
text align left <p class="left">
text-align center <p class="center">
text-align right <p class="right">
text tiny 65% <p class="tiny">
text small 85% p class="small">
text medium 90% <p class="medium">
text large 120% <p class="large">
text xlarge 180% <p class="xlarge">
All of my templates have image coding to style the look of the image. If you like one of these styles and it's not included in your template, just let me know and I'll send you the code.
 Float an image to the left without a border:
<img alt="" src="images/customer1.jpg" class="img-left">
Float an image to the right without a border:
<img alt="" src="images/customer1.jpg" class="img-right">
Float an image to the left with a border:
<img alt="" class="img-border" src="images/customer1.jpg">
Float an image to the right with a border:
<img alt=""class="img-right-border" src="images/customer2.jpg">
Float an image to the left with a border and a shadow:
<img alt="" class="img-catalog img-left" src="images/banner1.jpg">
Float an image to the right with a
border and a shadow:
<img alt="" class="img-catalog img-right" src="images/customer2.jpg">
Make a square image appear to be round and float it to the left.
[looks square in Design view]
<img alt="" class="img-round-left" src="images/banner1.jpg">
Make a square image appear to be round
and float it to the right. [looks square in Design view]
<img alt="" class="img-round-right" src="images/customer2.jpg">
Float an image to the left and add a frame to it:
<img alt="" class="img-frame img-left" src="images/banner1.jpg" >
Float an image to the right and add
a frame to it:
<img alt="" class="img-frame img-right" src="images/customer2.jpg" >
Float an image to the left and curve the corners.
<img alt="" class="img-curved img-left" src="images/customer1.jpg">
Float an image to the right and curve the corners.
<img alt="" class="img-curved img-right" src="images/customer2.jpg">
Float an image to the left and add padding and a light border.
<img alt="" class="img-gallery img-left" src="images/customer1.jpg">
Float an image to the right and add padding and a light border.
<img alt="" class="img-gallery img-right" src="images/customer2.jpg">
Float an image to the left and tilt it to the left.
<img alt="" class="img-rotate-left img-left img-frame" src="images/customer1.jpg">
Float an image to the right and tilt it to the
right.
<img alt="" class="img-rotate-right img-right img-frame" src="images/customer2.jpg">
If you have any problems, please don't hesitate to email or call. If you have any suggestions for this page, I'd LOVE to have them!
Marsha

You can use any major credit card
through PayPal at checkout.
Marsha-owner
Monday-Friday: 9am - 6pm
Saturday: 10am - 5pm
Sunday: Noon - 5pm
Eastern Time Zone